Thursday 18 December 2014

Textual Analysis: Red Lights.

Red Lights is a 2012 film directed by Rodrigo Cortés

At the beginning of the titling sequence, it begins with bright, small circles quickly fading in onto a black background and then disappearing as the fist name comes on the screen, in small white letters. This all happens relatively quickly, suggesting to the audience that the film is going to be fast paced. These fast-paced transitions are accompanied by discordant music which ranges from high to low pitch as the titles appear on the screen. Scratching sounds can be heard within the music, making it uncomfortable for the audience to listen to and already has them on edge.


An image of a shadow of two hands flashes up very quickly whilst another title is added on the screen. This image is in black and white, still with the black background as before, making the audience potentially question what they have just seen, making them on edge and anticipating the next part of the film. 

As the title 'Red Lights' appears on the right of the screen, in the center in capital letters and white writing, large red circles, which look to be lights, quickly flash up around the title, and then disappear randomly. To the left of the title, large white circles flash up and move around slightly and fade away quickly, which could make the audience feel rushed or shaken. 


An extreme close up image of an eye appears in large to the left of the screen in black and white, so the audience can see the veins and the eye in detail. This could make the audience feel uncomfortable again, yet it makes them wanting to know why this is relevant for later in the film. 

More images flash up on the screen randomly, some having been edited to that they jerk around the screen and some staying still, yet all in black and white. These images vary from an image of a Polaroid with a woman on it, to an image of a woman with tape over her eye, and an x-ray of a skeleton. These are all in black and white, suggesting that the images are hiding something that could be seen when in colour, for example, blood on a woman's face. By engaging the audience, this keeps them in suspense, all the while the discordant music is playing in the background, continuing to make the audience feel uncomfortable. 


Tuesday 9 December 2014

Harry Potter Studios.

Recently, I visited the Harry Potter Warner Brothers Studio Tour in London. The knowledge I gained from going to these studios, is useful for both my exam and coursework. On the visit, I gained an insight into the depth and detail that went into the production, writing and post-production of the films.

I learnt that many of the props and models had been created and designed before the sets were created during the production process. Make-up and costume was prepared and planned carefully and many hours were spent in doing this. Special effects were created using green screen, and computer editing.

Whilst on this visit, my group and I learnt the importance of preparation and production, and we realised how much is possible just through editing and using a green screen. This is something we will definitely consider when making our film.


Sunday 7 December 2014

Six Stages of Media Production.

In order to gain full knowledge and understanding of how to produce a film, i studied the 'Six Stages of Media Production'. On the prezi below, I have indicated what I found the most important, and how i think my group and I will accomplish each stage. 


Wednesday 3 December 2014

Audience Theories.

Uses and Gratifications.

In 1974 two theorists, Bulmer and Katz developed a theory: Uses and Gratifications.
This theory suggests that audiences use media texts for various reasons:

  • Diversion (escapism) -To escape from everyday life.
  • Personal identity: Create their own identity from characters/celebrities in media texts, and learning behaviour and values.
  • Personal Relationships: Use the media text for emotional and other interaction.
  • Surveillance: To gain information and knowledge.
  • Entertainment: As a means of relaxation, enjoyment and emotional release.
We will consider these theories when we are considering our target audience.

Hypodermic Needle Theory.
This theory is: according to the theory, the media is like a syringe which injects ideas, attitudes, and beliefs into the audience, who as a powerless mass have little choice but to be influenced.

The two-step flow.
This theory is an improvement on the hypodermic needle theory, suggesting that the information doesn't flown directly from text to audience but is interpreted.

Active V Passive.
Active: This makes you think about the film afterwards.
Passive: This doesn't affect the audience, and therefore they don't think about it afterwards.

I intend to think about these theories when producing out thriller.

Tuesday 2 December 2014

A Case Study: Hitchcock.


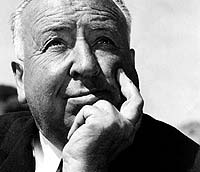
Alfred Hitchcock is the acknowledged master of the thriller genre he basically invented. He was an English film director and producer. Between 1940-1960 he was nominated for best director 5 times, he never won an Academy Award. In 1919 he began his film making business by illustrating title cards for Paramount Famous Players-Lasky studio in London. Whilst working here, he learned editing, art direction and scripting, and in 1992, he rose to assistant director.His shots were framed in order to maximize anxiety, fear or empathy. Later that year, he directed an unfinished film, No.13 or Mrs. Peabody. Hitchcock/s first completed film as a director was The Pleasure Garden (1925), an Anglo- German production filmed in Munich. 


His breakthrough film was The Lodger (1926), was a typical example of the class Hitchcock plot: an innocent protagonist is falsely accused of a crime and becomes involved in a web of intrigue. 

His creation of "subjective sound" is an early example of Hitchcock's technical virtuosity, in Blackmail(1929), which was his first film including sound. In "Blackmail" and in his 1930s film "Murder!", he first made the connection between sex and violence. He directed more than 50 feature films during his career which lasted over 6 decades. 

Often regarded as the greatest British film maker, he came first in a 2007 poll of film critics in Britain's Daily Telegraph, which said: "Unquestionably the greatest film maker to emerge from these islands, Hitchcock did more than any director to shape modern cinema, which would be utterly different without him. His flair was for narrative, cruelly withholding crucial information (form his characters and from us) and engaging the emotions of the audience like no one else. (Source: http://en.wikipedia.org/wiki/Alfred_Hitchcock


The following image contains a complete list of Hitchcock's films:


Sources:

Monday 1 December 2014

A Brief History of Thriller Films.

In order to gain knowledge on how to produce our thriller film, I did some research on the history of thriller films, seeing how they've developed over the years.

Media Timeline:


Source: http://www.disabilityplanet.co.uk/critical-analysis.html 


One of the earliest thriller films was 'Safety Last' by Harold Lloyd, which was made in 1923.
The making of thriller films began to increase from here:

  • The Bat Whispers (1930)
  • Dr. Jekyll and Mr Hyde (1931)
  • M (1931)
  • Murders in the Zoo (1933)
  • Gaslight (1944)
  • Laura (1944)
  • The Picture of Dorian Gray (1945)
Source: http://www.filmsite.org/thrillerfilms.html

Lighting Practice.

We did a lighting practice to gain understanding of how to use light to get different effects. We went in the music practice room, which was incredibly dark, and used artificial light from the torches on our phones, to get different effects. We also used natural light from the corridor to get different effects.


We also used the torch from our phone with this image. We positioned the torch below Carmel's face, and also one behind her head to get the background lighting.
We used our torch from our phone to make this shot. We positioned it slightly higher than Carmel's head and to the left of her face.
We positioned Carmel up to the door, with only the natural lighting from the corridor shining on. This shot helped show the different features of Carmel's face.


We also positioned Carmel up to the door with natural light on this one, however we didn't hold the camera as close with this image. The light is emphasised on her forehead and right side of her face.

Textual Analysis of Se7en.


Sunday 16 November 2014

Convention Of A Thriller Film Genre.

According to Writersdigest.com (http://www.writersdigest.com/qp7-migration-conferencesevents/qp7-migration-maui/10-basic-ingredients-of-a-successful-thriller)  the essential ingredients to a thriller are:
•you need a good story. 
•have the story told from the point of view of the person with the most to lose. 
•try and have multiple points of view, as this allows the audience inside multiple characters heads. 
•immediately open your thriller with an action theme, then include the character information later. 
• make it clear early on what the protagonist wants, and what he fears. 
•the main characters have to change emotionally thoughout the film. 

According to justicemitchell.com (http://justicemitchell.com/justice-mitchell/2010/8/23/horrorthriller-movies-the-key-ingredients-to-fear.html) they believe the essential ingredients of a thriller are: 
• make an everyday task frightening.
•try and make a scene scary in the day.
•try and make a scene thrilling without a musical build up. 


Saturday 15 November 2014

Beginning of Research And Planning.

Recently, we began the 'research and planning' stage of filming our final piece.

Me, Lois, Carmel and D'arby have decided to work as a group to produce the opening to a thriller, as we worked so well together on our preliminary task. 

In our past few lessons, we began our research. We looked at openings to thrillers, to see if we could get any inspiration from them. We looked at films such as 'the purge' and 'Anna'. We thought about several different camera shots we are potentially going to use, and different possible location ideas. 

We brainstormed our ideas, for future references and ideas.


Saturday 8 November 2014

Titling Practice.

After we finished our preliminary task, we were asked to complete a titling task, which just involved adding a title sequence to a clip of film, either our own preliminary task, or just a random clip. We could work on our own or in pairs. 

Lois and I worked together, and with neither of us having ever done titling before, it was quite difficult. It took many attempts, however we eventually managed to add an opening title to our piece. 


Friday 7 November 2014

Barthes' Narrative Codes.

Barthes' narrative codes help describe the meaning of the narrative. There's 5 different codes, which are:

  • Action Code: The audience will recognise an action code in a media text as it is used to indicate what is the next logical step in the narrative.

  • Mystery Code or Enigma Code: This code is used to control what and how much information is given to the audience to explain the narrative. It helps grab the audience's attention, by setting up a problem which is resolved during the course of the narrative.

  • Semic Code: This code is about signs and meanings to help tell us about its narrative and characters. For example,there may be garlic to symbolise the supernatural.

  • Cultural Code: This code is used to help the narrative make sense to a culturally and socially aware audience. It makes reference to elements form the real world, such as the language something is spoken in or written in on the screen.

  • Code of Oppositions: This code refers to a narrative that relies on binary opposites.

Whilst we didn't understand or know what Barthes' codes were whilst we were filming our preliminary task, we did subconsciously use some of the codes

We used the action code, when the protagonist was walking through the door, as you could see her put her hand on the handle, suggesting she was about to walk through the door.
We used the mystery code, when antagonist kidnaps the victim and ties her up in the cupboard, as the audience don't know why she has been kidnapped, and therefore this grabs the audience's attention, and this will be resolved later in the narrative.
We used the cultural code, as the film was shot in school, therefore suggesting that the girl who got kidnapped was educated, showing the audience that they're from at least a working class background. This gives the audience indication as to what society the characters are from.
We used the code of oppositions as we used a protagonist and antagonist, therefore our piece relies on binary opposites, as the two characters are contrasted. We could have developed this further by deciding specifically that the antagonist would wear dark clothes, and the protagonist wearing much more brighter coloured clothes.

However, when filming our piece, we didn't include the semic code. We could have included a symbol to suggest why the victim got kidnapped, or to emphasise the fact it was a thriller. This is something we will have to include specifically when filming our final task.

Tuesday 14 October 2014

Location Scouting.

Finding the right location for filming our preliminary task, wasn't as difficult as I first anticipated. At first, I thought that finding an empty room, which we could use whenever would be difficult, however we managed to use the English store room without any issues. 
All of our filming takes place in only 4 different locations: the English store room, the English corridor, outside the English store room and the expressive arts corridor. The majority of our clip takes place in the store room. As it was lesson time when we were filming, the corridors were empty the majority of the time, therefore, making it easier to film without interruptions.


English Store Room.


Outside the English store room.


Expressive arts corridor. 


English Corridor. 

Wednesday 8 October 2014

Some Things Are Not Going As Planned.

Currently, my group and I are in the midst of filming our preliminary task. However, some things aren't going as smoothly as we first anticipated. 

Things were running smoothly, such as wearing certain clothes on certain days, to ensure our continuity during the clip is perfect, and getting as much of our filming done as we could to ensure we have enough time to edit, etc. However, this all changed at the beginning of this week, when my teacher was on a school trip (how inconsiderate!). 
On Monday, everyone in my group had worn the appropriate clothing, in order for us to carry on filming. We were all set to begin filming, when we had no keys to the cupboard the camera's were in! Even though we sent our other teacher on a wild-goose hunt in order to find the keys, there was no luck. This meant we lost an hour worth of filming, and couldn't edit as our footage was still on the camera. With nothing else to do, we had to blog!

Today, was possibly even worse! We dedicated today's lesson, purely for editing (mainly because everyone forgot to wear the correct clothes), however when went to get the footage off the camera from out previous lesson, we discovered it was no longer on there! We decided, that someone had either deleted out footage or the SD cards had been swapped. Going though every single SD card would take way too long, and would be a waste of a lesson and everyone else's time. This meant, we were to film our footage again, however luckily we had already saved some on to the computer. This meant, we were able to edit a small amount of footage, and therefore the lesson wasn't a complete waste of time. 

In the future, we've decided to save our footage to the computer immediately, in order to avoid this awkwardness.   


Monday 6 October 2014

Utopia-Post Production.

The Sci-Fi series Utopia, is based around a mismatched group of people who discover a global conspiracy within a comic book. 

The TV show is widely known for it's extreme use in colour. Director Marc Munden uses the Technicolour palette of 1950s Hollywood, in order to replicate the graphic novel's bold aesthetic. Munden says "Normally the way you'd colour a piece of cinematography is by constructing it with greens, blues and reds. The three-strip Technicolour process we use is comprised of the opposite colours-yellows, cyan, magentas" 

During post-production, Munden and colourist Aidan Farrell carefully colour-correct each shot in order to give the shot a comic book effect. "We choose certain colours like yellow and turquoise and paint them into shots afterwards. The skies that we shot weren't always blue, they were mostly grey British skies. The same goes for making the grass greener, eyes brighter, or turning a blue van yellow" says Munden.

From this article, posted on wired.co.uk, I have learnt, that during post-production, almost everything can be manipulated into something that it isn't. Post-producton can be used to make something look like it's something almost completely different coloured, and therefore things such as the weather or time of year doesn't effect the production of the filming as it can be edited later on. 

In the lead up to filming my opening to a thriller later in the year, I can begin to think about the sorts of things which effect production, and what can be edited/changed during the post-production. For example, I may not have to worry about the fact that when i'm filming it may be blue skies, despite the fact in a thriller, stereo-typically in a thriller the skies would be grey and dull, because we can edit this into the scene, during post-production. 

I have found out, that a lot of things which may hold me back when I come to filming, such as the colour of someone's clothes or the type/time of day, can be altered and almost fixed later on in the process, therefore making it easier to get the effect I want. 

This image is a perfect representation of the sorts of things which can be done during post-production. This shows us that an image which could be just considered dull and not that interesting, can then be changed into something which has much more depth to it, and the final image will fit the theme of the scene much more appropriately. 

Sunday 5 October 2014

Preliminary Task- Storyboard and Planning


For the planning of our preliminary task, we were asked to create a storyboard of our short clip, in the sequence of shots were going to take place. This is to help the rest of my group and I to understand the order in which things are going to take place, in order to avoid confusion. We have been told, that our storyboard must follow the main idea of our story, however if we film something slightly different, it won't matter. 

Unfortunately, nobody in our group is amazing at drawing, however that doesn't matter, as it still gave us the general idea of what shot is going to be used at what point, and how the clip is going to flow. Our storyboard helps give us the sense of continuity and direction, as it helps us understand what shot we need to achieve next. 

Preliminary Brief: Continuity Task


For our preliminary task, we have been asked to film a short clip, in which we must include certain continuity techniques. The short clip must include, a character opening a door, crossing a room and sitting down in a chair opposite another character, with whom she then exchanges a couple of lines of dialogue. The clip must include; match on action, the 180 degree rule, and an example of shot/reverse shot.

For this task, I am working with, D'arby, Lois and Carmel. We have all decided it would be best to make this clip creepy and tense, in order to prepare ourselves for our final task of making an opening to a thriller.

Match on Action: This refers to film editing and video editing techniques, where the editor cuts from one shot to another, whilst still matching the action in the first shot. Even though the two shots may have been filmed with a significant period of time in between, it gives the effect of a continuous flow of time. 

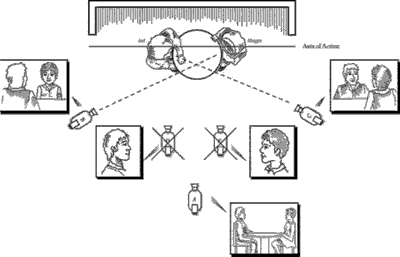
180 Degree Rule: When filming a clip with two characters in, they should always have the same left/right relationship to one and other. This is to avoid the sense of disorientation and to help the audience with spacial awareness. The camera must always stay on one side of the imaginary line, in order for this shot to work. 


Example

Shot/ Reverse Shot: This is a film continuity technique, where one character is shown to be looking at the other character, often when having a conversation, then the shot cuts back to the other character. This shot is often used to show the reaction of each of the characters individually. 


Sunday 21 September 2014

Framing a shot: Practice with Stills.

I was set the task of taking a series of practice shots, which included an antagonist and protagonist, and certain shots had to be included. I teamed up with Darby and Carmel to achieve this task. With Darby playing the protagonist and Carmel, the antagonist, I was behind the camera. 

Our first shot was an establishing shot, in order to show where the storyline/scene is going to take place. This shot is particularly useful as it shows a large area at once, and therefore makes the protagonist seem much more vulnerable.


The long shot whilst using a background helps to create a feeling of isolation for the protagonist, as it shows the size of the protagonist directly compared with the size of the setting and place.

Using the rule of thirds, we managed to create a long shot, which captured both the protagonist and antagonist. We wanted to create the feeling that they were still outside and are more exposed. We decided that the antagonist would be staring directly at the protagonist, even though they are stood close together. 

We decided we would use the low angled shot, by taking the photograph from below the antagonist, inorder to make them look much bigger than they actually are, to create a sense of disorientation and fear. 

Next, we decided to follow the low angled shot with a long shot using a leading line. The leading line is used to lead the eye to another focus point within the image. We used it to ensure the focus was on how small the protagonist looks from the antagonist's point of view. 


An extreme close up (ECU) is used to create suspense, as it focuses on only one specific object, sometimes with a very small amount of background showing. In our ECU, we blurred our the background, in order to create a feeling of doubt as to what's in the background. 


Finally, we shot the same image from three different viewpoints. We shot the antagonist lent against a tree, in order to deceive the audience. We used a long shot, low angle shot, and a close up.


Introduction...

I am currently starting my first year studying Media, however I'm intrigued to find out what I've gotten myself into. By that, I mean, I'm excited to find out how films and TV shows are made, as I'm a fan lf movie nights and TV box set marathons. 

Particularly, I am looking forward to taking photographs and filming videos(and trying the new equipment!), as photography is a small hobby of mine already. 

Much off my time is taken up by reading blogs or watching 'vlogs' by my favourite youtubers, therefore some of my blogs will be inspired by them. Social media is a big part of my life, and more often than not, I'll be rapidly posting on twitter, when I'm supposed to be doing something much less interesting.

As part of my AS grade, I have to produce an opening scene to a thriller. This short clip will have to create different sorts of emotions for the viewer, such as suspense and tension. 
Overall, I am looking forward to creating these feelings by experimenting with different equipment, and learning the art of film making.